DNT: Docker Node Tester

Use Docker to test code against multiple versions of Node.js and io.js simultaneously


Docker is a tool that simplifies the use of Linux containers to create lightweight, isolated compute "instances".
DNT contains two tools that work with Docker and Node.js to set-up containers for testing and run your project's tests in those containers.
What incantations does this magic require?
- You will need to install Docker on your system, see the installation instructions (don't be afraid, it's pretty simple).
- Install DNT from npm:
sudo npm install dnt -g - Create a .dntrc file for your project(s) (instructions below).
- Run
sudo setup-dntto set up the Docker images required for your project. It will take some time to download, compile and install the required software but once you've done it once your images are re-usable and you'll only need to set up additional images you require in the future. - Run
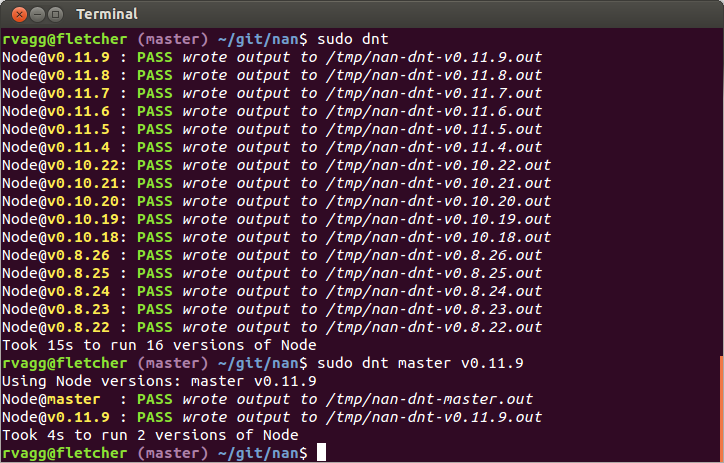
sudo dntto run your test suite via DNT against all of the Node versions you've specified.
About the images DNT creates
The setup-dnt script sets up the most basic images required to run Node.js applications, nothing extra.
It first creates an image called "dev_base" that uses the default Docker "ubuntu" image and adds the build tools required to compile and install Node.js
Next it creates a "node_dev" image that contains a complete copy of the Node.js source repository. Finally, it creates a series of images that are required by your current project (or the .dntrc file in your current directory).
For each Node version, you will end up with an image named "node_dev-VERSION" where VERSION is the branch or tag in the Node.js repository. Typically this takes the format: "v0.x.y", e.g. "v0.10.22", "v0.8.26", etc. You can also specify "master" if you need the bleeding edge.
.dntrc
Both setup-dnt and dnt read the .dntrc file in the current working directory to load the current configuration. The file is simply read as a Bash script so it can contain arbitrary Bash commands. To configure DNT you need to set some key variables: NODE_VERSIONS and TEST_CMD. Optional variables include COPYDIR, OUTPUT_PREFIX, SIMULTANEOUS, COPY_CMD and LOG_OK_CMD.
A basic .dntrc file for a Node package with a native add-on component might look like this:
## DNT config file ## see https://github.com/rvagg/dnt NODE_VERSIONS="master v0.12.4 v0.10.38 v3.3.0 v4.0.0"OUTPUT_PREFIX="libssh-"TEST_CMD="\ cd /dnt/ && \ npm install && \ node_modules/.bin/node-gyp --nodedir /usr/src/node/ rebuild && \ node_modules/.bin/tap test/*-test.js \"NODE_VERSIONS
Required
A space-separated list of branches or tags in the Node.js repository. For each version listed, the Docker image for that version will be run with a copy of your source code and the TEST_CMD will be executed.
This can also include io.js version numbers.
Note also you can override the list by supplying any number of versions as command-line arguments:
$ sudo dnt master v0.10.20Updating your list of NODE_VERSIONS
As you add new versions of Node to test against you will need to re-run sudo setup-dnt to make sure you have images set-up properly for these new versions.
Testing against Node master
If you are using "master" as one of your versions then you will need to occasionally remove and rebuild your master image:
$ sudo docker rmi node_dev-master$ sudo setup-dntThis removes the Docker image for master and rebuilts it from the latest master in the Node repository.
TEST_CMD
Required
A command, or list of commands to be executed with Bash (/bin/bash -c "${TEST_CMD}") that will invoke your tests and cause them to run. The commands will be executed as root in the container and you may need to install additional software to execute your tests or compile your code.
You should prefer && to ; to separate commands so a failure causes the list of commands to fail.
By default, your entire source directory minus .git/ and build/ are copied into the container; this includes node_modules/. The copy will be located in the /dnt/ directory of the container (this can be configured with COPY_CMD below).
If you are using native-addons as dependencies you may need to purge them from node_modules/ directory prior to running npm install to reinstall them.
Your test output should include some method of verifying a pass or fail. See LOG_OK_CMD for how to parse this if required. You should also make it verbose enough to debug the output from the log files sent to /tmp/.
COPYDIR
Default: current working directory
DNT copies the current working directory into each image prior to test execution. This is done by mounting the directory in the image (read-only) and using rsync to perform a copy. To customise the directory being mounted, change COPYDIR.
OUTPUT_PREFIX
Default: ""
Logs for each run are sent to /tmp/dnt-VERSION.out where "VERSION" is the Node.js version being used. Supply an OUTPUT_PREFIX to prefix a project name to the beginning of the filenames.
SIMULTANEOUS
Default: number of cores on the current computer
By default, DNT will run parallel tests, up to the number of cores on the current computer. This may be too much for some computers, depending on other system resources and the jobs being executed so you may want to lower this number.
COPY_CMD
Default: rsync -aAXx --delete --exclude .git --exclude build /dnt-src/ /dnt/
Override this command to adjust the way DNT copies the mounted source directory to the required test folder in the image. The source folder will always be mounted as /dnt-src/ but the /dnt/ target directory can be changed if you take this into account in your TEST_CMD.
LOG_OK_CMD
Default: tail -1
DNT is designed to work best with TAP which outputs a single "ok" or "not ok" as the final line of the test execution. The LOG_OK_CMD is a command that will take the complete log file piped to it and return either an "ok" to indicate a pass or something else to indicate a failure. i.e. cat log | ${LOG_OK_CMD}.
If you are not using TAP-output then you can adjust the LOG_OK_CMD to transform the source to return an "ok" when the tests have passed. You may need to resort to a bit of sed depending on your testing framework.
CONSOLE_LOG
Default: false
When set to true standard error is redirected to standard output and then tee sends this standard input to standard output (i.e. the console from which the dnt command was executed) and the normal log file will also be logged too.
Example .dntrc files
- LevelDOWN: simple requirements, latest 0.8, 0.10, 0.11 and master.
- NAN: needs to test across many versions of Node, including master. Has tests installed and run in non-root directory.
- node-ssh: latest 0.10, 0.11 and master only. Needs additional software installed on the image prior to compile.
- rvagg/node-canvas: latest 0.8, 0.10, 0.11 and master only. Needs Cairo installed and translates the dot reporter for Mocha tests.
Other considerations
-
You should check your logs occasionally to make sure that tests are actually running. node-tap, if run incorrectly can execute zero tests and output an "ok" which will still pass. Your
LOG_OK_CMDmay also be doing unexpected things. -
The initial node_dev Docker image you create has a copy of the registry at the time you first run
sudo setup-dnt. As this gets older it will take longer to download the latest master or new versions of Node. You may want tosudo docker rmi node_devto fetch a new copy. -
If your test environment requires specific fixtures that take a considerable amount of time to set up for each test (for example an installation of a database or other complex software) then you could consider customising the node_dev Docker image to have the environment partially set up so you don't need to repeat the process for each test run. Note though that this is not portable for other people needing to run your tests with DNT without specific additional instructions.
What about Mac, Windows, SOLARIS?
What about them?
Solaris invented containers with "zones" and Solaris users are grown-ups and can take care of themselves.
Mac users can install docker via docmac: npm install -g docmac && docmac or follow these instructions.
The rest of you babies, well... are you really deploying on those toys?
Contributing
Yes please, I'm happy to share ownership with people making significant contributions to the code, you're welcome to help steer the project if you invest enough.
Currently DNT serves my simple needs but I imagine that for a lot of people there will be additional requirements different to my own. Please open an issue or pull request for further discussion!
Contributors / collaborators / maintainers
Licence & copyright
Copyright (c) 2013 Rod Vagg
DNT is licensed under an MIT +no-false-attribs license. All rights not explicitly granted in the MIT license are reserved. See the included LICENSE file for more details.